October is almost here, which means it's almost time for my sweet Gavin to celebrate his 5th birthday!! With us both having October birthdays, we look forward to the leaves changing colors and all the Halloween festivities the month brings. As I prepare for his big birthday bash I have been busy creating invitations for his big day.
He chose to have an alternative party this year, instead of the traditional Chuck E. Cheese or home party. So we will be heading to our local theme park for a fun filled day of rides, Halloween festivities, trick-or-treating, and a costume parade. Check out my little "batman" in the invitation that I created for his birthday. If you are in need of invitations for any event, I can create those for you. I usually send the picture to Walmart and have them print it on photo paper. They look great printed on card stock as well. This year, we're doing digital RSVP's so I just sent the invites by email. Saves paper and stamps! :-)
Thursday, September 27, 2012
Sunday, September 16, 2012
Down on the Farm: My Literacy Centers
NEW!! Just posted my new format for my literacy centers this year. Our next theme for September will be farms and I have created this literacy center pack to use in my center bins. Each of my students have a center schedule that tells them which literacy center activity to do each day.
I will be posting more information soon on how I teach reading and how I manage my classroom during that time. Check back soon for those documents. Have a wonderful Monday!

Monday, September 3, 2012
Ultimate Number Sense Game Pack GIVEAWAY
I hope you all have had a great start to your school year and are ready to dive into the Common Core. I have just uploaded a huge resource pack to help you teach number sense to your first graders. This game pack contains 169 pages of full color games including numbers in sets, number words, tallies, base ten blocks, and more. Click on the pictures below to check it out!
The first person to guess the name of my favorite candy will win this Ultimate Number Sense Game Pack for FREE!! Good Luck!! Be sure to leave your email address in your comment.
Have a great week everyone!

Labels:
giveaway,
math,
number sense
Saturday, July 28, 2012
Back to School SALE and Gettin' Crafty
It's hard to believe that some of you have already started your school year! The rest of us will be joining you in just a few short weeks. Has anyone had any back to school nightmares yet? OMG! I usually get them really bad the entire week before school starts. I have had dreams that it was open house (orientation) and my classroom was completely bare!! That's definitely a huge worry of mine! HA!
To help ease your fears of those back to school nightmares, I have a really awesome Back to School B.O.G.O. sale starting now and running through the end of August. Click on the picture below to begin shopping! :-)
When you shop at my Teacher's Notebook store, following your purchase, you get to choose any other item for FREE!! Now that's a great deal!!! After your purchase, just send me an email (michelle83mcelhinny@gmail.com) with your FREEBIE selection. Please be sure to include your Teacher's Notebook user name just in case it's different from your email address. Remember, the free item that you choose must be of equal or lesser value than than the highest priced item of your purchase. You can make as many purchases as you want in the month of August and you will always get to choose that FREE item!!
GETTIN' CRAFTY
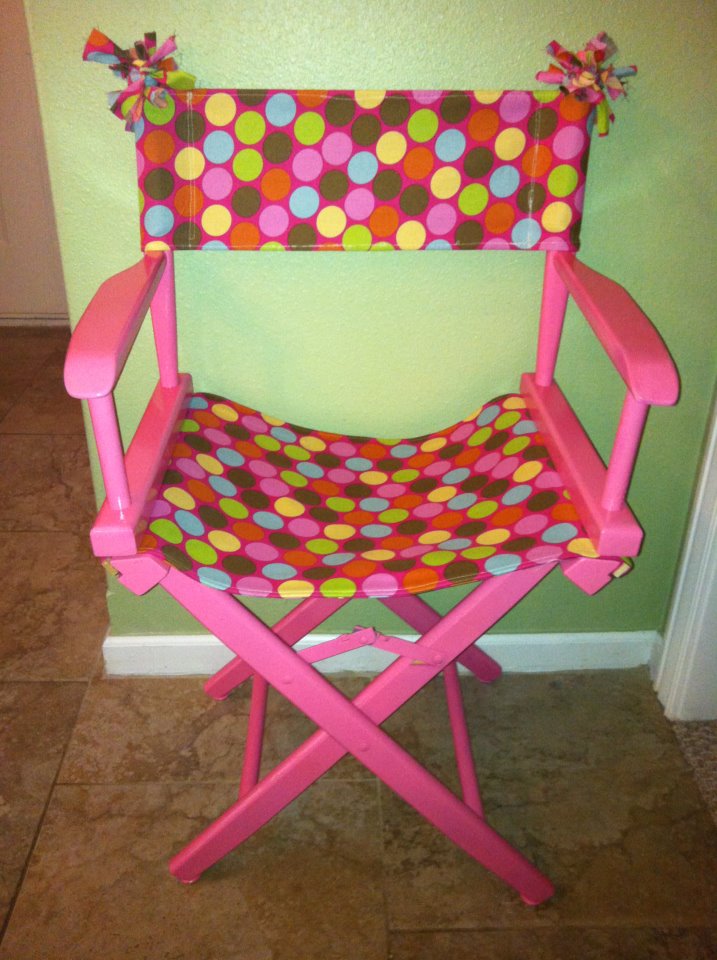
Well, before I left for vacation I was gettin' a little crafty with this boring directors chair that was sitting in my classroom. I guess I probably should've been packing but I'm a huge procrastinator. :-) Oh well! Read the rest of this post for a tutorial of how I jazzed up my chair and for how you can get crafty with a chair just like this one.
I use this chair in my classroom for writing celebrations and student sharing. Students even like to sit in it as a special privilege for silent reading. You can get a directors chair just like this one at Pier 1. This is what the chair looked like before I began.
The first thing I had to do was pull the boring blue fabric off of the chair. The fabric on the back of the chair just slides right off when you pull it upwards off of the poles. The bottom part was a little bit tricky. Once you take the top part off, the arm rests kinda fall down to the sides. When the sides are down, it exposes a long piece of wood that is wrapped in the fabric for the seat part of the chair. I just pulled the fabric up and out towards the middle of the chair and wiggled it until the wood pieces came out. I removed the wood from the fabric and set them both aside.
The next step was the fun part! Spray paint!! I took the bare wooden chair outside (Gavin and Landen tagged along) and placed it on a piece of cardboard in my driveway. I kept the arm rest leaned down to the sides so I could get inside the crevices really good. I sprayed every inch of the wood and the metal pieces with pink spray paint. (I'm pretty sure you're not supposed to spray paint on metal hinges or screw parts...Oh well...I wanted it all PINK!) So as I'm spraying, my boys think it's fun to experiment to see if a piece of grass would stick to it if they threw it on my FRESHLY PAINTED CHAIR!!! Goodness! Boys will definitely enhance a mother's ability to be patient! After the chair was completely covered in pink, I just dragged the cardboard and chair into my garage so it could dry over night.
I went to a craft store (Hobby Lobby) and got just one yard of polka dot fabric. When I saw it at the store, I just had to have it! That was the easy part! I could probably spend an entire day in this store!! They just have so many great things that teachers get excited over...like this glitter scrapbook paper!! Gavin actually spotted it because it was SPARKLING!! I'm not sure I have a use for this yet, but a super fun must have for the future. Way to go Gav!
Now on to the hard part...the fabric! I used a seam ripper to take the stitching out of both pieces of fabric, including all of the edges. This allowed me to lay the blue fabric completely straight. Keep in mind the stitch points when the fabric is folded and sewed. You will need to sew the fabric back together in the exact same spots.
I took the polka dot fabric and wrapped it around the blue fabric so I could get an idea of how much polka dot fabric I needed (it's kinda like wrapping a gift). You want just enough polka dot fabric on the blue fabric but not too much. I left about 1/2 inch of polka dot fabric around the edge of the blue fabric. I put the polka dot fabric on my table face down and placed the blue fabric on top (leaving that 1/2 inch of extra polka dot around the edges). I took some adhesive spray and sprayed the top of the blue fabric and then I folded the polka dot fabric on top of the blue fabric so the colored part of the polka dots was now on the outside. You're essentially wrapping the blue fabric with the polka dot fabric, just like you would wrap a gift...only it's a lot thinner. When you have smoothed the polka dot fabric onto the blue fabric, so there's no bubbles or wrinkles, flip it over.
Next, you'll want to use a regular glue stick on the edges of the blue fabric to get the polka dot fabric to stick to the uncovered blue side. This will allow you to move things around if necessary without getting too sticky with the spray adhesive. When the 3 sides are folded down onto the exposed blue fabric, you will then spray this side of the blue fabric and smooth the polka dot fabric from the middle to the edges. You really don't want the edges of this side to stick just yet. Once you have the middle smoothed out, spray a little more spray adhesive onto all of the edges and tuck under the fabric edges so the frayed part of the fabric is not exposed. All of the edges should match up and all of the fabric should be tucked under to create a closed seam. Set aside and do the same thing to the other piece of blue fabric.
On to the sewing! After the blue fabric is completely covered with polka dots, you will need to sew around the entire piece of fabric to keep all of the edges tucked under. Repeat to both pieces of fabric. Then you will need to sew the sides back together, just like it was at the beginning. This is where you want to remember the stitch points where the fabric was folded and sewed.
Once everything is sewed back together, you can now reassemble the chair. Make sure the paint is dry! I waited 24 hours. I cut the extra fabric into strips and tied it in knots around the top of the chair.
Here is the AFTER picture!

Labels:
back to school,
craft,
furniture,
sale
Tuesday, July 24, 2012
100 Facebook Followers WINNER and Seussy Stripes posters
It has been quite a journey reaching 100 followers on my TpT store, Blog, and now my Facebook page. It really means the world to me that I have such wonderful followers! You all are the reason that I write and create fun things to use in the classroom. So I just want to say THANK YOU!!!
The last winner of the 100 Followers Giveaway is....drum roll please...ba da ba da ba da ba da
...Lisa Richling!!
There will be more giveaways coming soon so check back often. If you haven't signed up for email notifications, you can sign up under the "Follow Me" section to be the first to get Our Sweet Success updates.
Classroom Centers/Stations Posters
{Seussy Stripes}
Another request came in for some center posters to go with a Dr. Seuss themed classroom, so I adjusted the background from the center/station posters that I previously posted in polka dots.
The background is from The 3am Teachers Clip Art Collection: It's a Silly World and I thought that it would go well with any Seussy themed classroom or any primary color themed classroom. The posters come in two different styles depending on your center/station preference. Click on the pictures below to download the posters.
Each download contains 43 different center/station signs for you to choose from:
Graphing
Graphing
Math Games
Poetry
White Board
Hundreds Chart
Math Literature
Problem Solving
Word Study
Math Fluency
Meet with the Teacher
Writing
Computer
Listening
Science
Smart Board
Social Studies
Word Work
Read the Room
Write the Room
Letter
Big Book
Pocket Chart
Puppet
Art
Fine Motor
Sewing
Dramatic Play
Sand and Water
Play-Doh
Illustration
Retelling
Manipulatives
Discovery
Lego
ABC
Blocks
Home Living
Literacy Bag
Reading
Buddy Reading
Puzzle
Laptop
Projector
Both of the downloads include the matching pocket chart cards to go with each of the 43 posters. Use these to manage your center/station rotations.
If there are any posters that are not included in this package, please let me know and I can add them for you. If there is a particular item that you are looking for but cannot find it, please just ask for a custom order. Get your orders in soon so you have them before school starts. I can create just about anything that you might need for your classroom in just about any theme that you might be doing. You can reach me by email at michelle83mcelhinny@gmail.com.

Subscribe to:
Posts (Atom)